
PCF Localization

Today we have more than 100 open source PCF components and we should really start working on some best practices when developing the controls.
The thing I want to point out today is the localization of the PCF components. Your component will be downloaded by people all around the world and let's assume that there are people that want to use the component in their native language.
Let's use the inbuilt localization API in the framework to support multiple languages in our components. We can open our repositories for contributors that are not real developers to contribute with translations and make the component even better.
How can we achieve that?
RESX files
The answer lays in the ControlManifest.Input.xml file that is generated by the Power Apps CLI in the resources node.
The line that contains the resx node is the answer to our problem.
RESX file is basically an XML formatted file that contains keys and the localized string values and it's created per language.
An example of one RESX file can be found below and you can use it as a template for building all the localization files.
text/microsoft-resx


2.0


System.Resources.ResXResourceReader, System.Windows.Forms, Version=4.0.0.0, Culture=neutral, PublicKeyToken=b77a5c561934e089


System.Resources.ResXResourceWriter, System.Windows.Forms, Version=4.0.0.0, Culture=neutral, PublicKeyToken=b77a5c561934e089


Localization
Label for localization input
Localization API
PCF supports two types of control localization. You can set localized values to the config page for the control that will show up in Form Editor or you can localize the values that will be shown when control is rendered on the form.
With those 2 cases, we cover both citizen developers that are doing the configuration and the end-users that actually see the control in their own language.
Adding RESX to the control
Adding a new RESX file to the control project is quite easy.
The first thing you need to do is uncomment the resx node from the generated manifest file that you got from Power App CLI's init method. The thing you need to know here is that there is a special naming convention behind those RESX files in order to work properly.
RESX files should end with a locale identifier (LCID).
The example below is showing the name for the English (LCD = 1033) language RESX file.
A list of all languages and LCIDs can be found here.
TranslationExampleControl.1033.resx
The best practice is to create a strings folder inside your control folder that will hold all RESX files.
Your manifest should look something like this.
The next step is to create a RESX file inside the project. Create a strings folder inside the control project and add a new file RESX file. 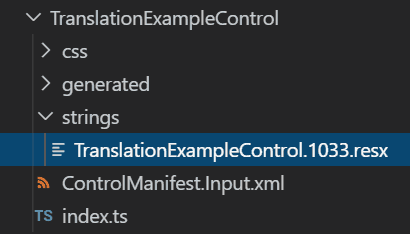 Copy the RESX template from the RESX section inside the newly created file. Locate the data node on the bottom of the file. Data node can have 2 child nodes called value and comment. Data node is the important one and it will hold the localization value for the key that is defined in the data node. In the example below, we will have s key **Input_Value_Display_Key** that will be replaced with **Textbox Input** text when we will be using the app in the English language. Let's add just another one that will be used for control description called **Input_Value_Desc_Key** and set the value to **Single line text input field**. ``` Textbox Input Single line text input field ``` ## Configuration localization The first thing that we will do is to translate the configuration page of the control. Make sure that you have your keys in the manifest file. Our keys, **Input_Value_Display_Key** and **Input_Value_Desc_Key** should be located in the property tag. When you did that push the control to the environment and see if it works. If you did everything right it should look something like this. 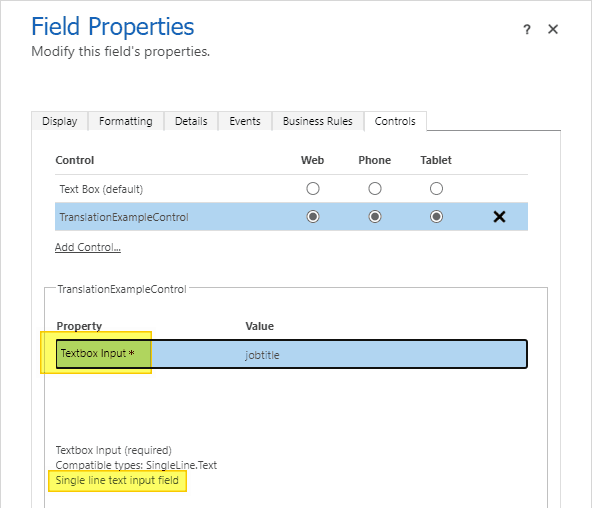 You can see that the Textbox Input string is located in property name and the Single line text input field is shown on the place of field description. Let's add support for another language, it will be Croatian in my example, but of course, you can put any language here. LCID code for the Croatian language is **1050** so we need to create a file that ends with it in our strings folder. I will create a RESX file named **TranslationExampleControl.1050.resx** and copy the whole content of the English file as a template. Now we need to change the values for our 2 keys we created before to match the Croatian translation for those strings. <table class=""><tbody><tr><td><strong>English</strong></td><td><strong>Croatian</strong></td></tr><tr><td>Textbox Input</td><td>Unos teksta</td></tr><tr><td>Single line text input field</td><td>Polje za unos teksta u jednom retku</td></tr></tbody></table> We have the translations in the table and all we need to do now is to change the key values to the right strings. ``` text/microsoft-resx 2.0 System.Resources.ResXResourceReader, System.Windows.Forms, Version=4.0.0.0, Culture=neutral, PublicKeyToken=b77a5c561934e089 System.Resources.ResXResourceWriter, System.Windows.Forms, Version=4.0.0.0, Culture=neutral, PublicKeyToken=b77a5c561934e089 Unos teksta Polje za unos teksta u jednom retku ``` Croatian RESX file should look like the one above. The last thing we need to do is to add the RESX to the manifest file just like we did for the English version. Just add new resx tag inside the manifest and set it's path to **strings/TranslationExampleControl.1050.resx** . What we need to see the result is to publish a control to the environment on which we have the base language set to Croatian in order to see the changes. Once we did that let's open the control configuration page again and see the result. 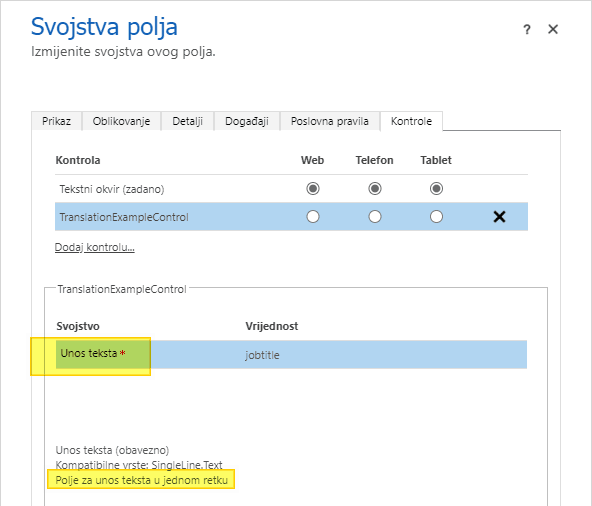 There we go, translated values for field name and description are here. You can play with all strings in the manifest to change the values in the configuration page. ## Control UI localization Now we know how to change the values in the configuration page and it's time to try to change the values in the UI of the control. We will add a simple textbox element to our control and change the placeholder text. Add a bellow snippet in the init function. ``` let texbox = document.createElement("input"); texbox.placeholder = ""; container.appendChild(texbox); ``` There is a placeholder attribute that holds value **<THIS_HAS_TO_BE_CHANGED>** and we want to change that value to the appropriate language string. Let's reuse the key **Input_Value_Desc_Key** in our RESX file for this purpose. Luckily there is an API call that will help us to fetch the right string value. ``` context.resources.getString("Input_Value_Desc_Key") ``` The function above gets the value for the key passed as the parameter for the current language set in user settings. Time to use it in our little snippet of code. ``` let texbox = document.createElement("input"); texbox.placeholder = context.resources.getString("Input_Value_Desc_Key"); container.appendChild(texbox); ``` Once we did that we are done. Let's build and push the control to the environment. First, let's check how it looks like if the English is set as our language in Personalization Settings. 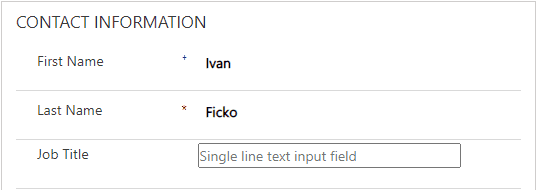 Now we need to change the language by going in **Personalization Settings -> Languages** and change the **User Interface Language** to Croatian to see if we will get the placeholder translated to the Croatian language. Once the page is refreshed we should see that placeholder text has changed. 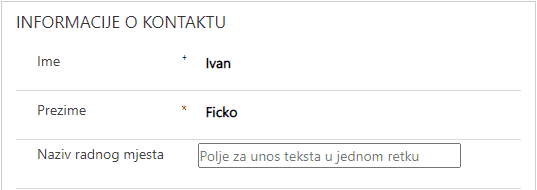 Everything is working as expected and now you know how to change the strings all around the PCF controls based on the language. ## Conclusion This time we showed how we can make our controls more accessible to people that don't understand more than one language, probably only their mother tongue. I would never use my apps in Croatian, but I'm sure that there are people that would be more than happy to do it. Let's make both of us happy by making the controls in more languages or at least make them more customizable for others that can maybe only contribute by adding the translations to the control in the end. Keep in mind that a localized configuration page will only be shown in the base language that was set when someone provisioned the environment. UI translations, on the other hand, will be applied to the user's language that is set in the Personal Settings and in that way you can support multilanguage control on the same environment for the users that use different languages.