Live Dataverse data in email

Introduction
We all know that it's possible to send static Dataverse data in an email that we send as a notification to the user, but what happens when sent data is not relevant anymore to the user. Data can be changed before the user opens the email with old data and in that case, it's maybe not helping him at all. We need to figure out how to send live data with an email.
Idea
You can try to send an email with custom JavaScript that does something useful, but email clients will just trim that script part and your email will still be a static one. The same thing happens with you add the IFrame element that you can try to add to the email.
The only way you can pass dynamic data to the email is an image with a URL pointing to the web service that is returning an image back to you which will then be rendered in email.
In this example, we will create a web service that will fetch task records by ID. It will return HTML converted to the image based on the data that is currently live on the task record. After that, we will use that web service in the Power Automate flow to send an email when the task is created. Email will include image that what will point to the created web service.
Let's do some work!
Solution
Creating web service
First we need to create a web service that will communicate with our Dataverse instance and construct images from the retrieved data.
We will use Azure Functions as our weapon of choice in this example, but you can choose whatever suits you best when building a web service.
Create new Azure Functions project in Visual Studio and add a simple HTTP GET function to it.
Few NuGet packages are needed for this example so please install following packages:
- HtmlRenderer.Core
- HtmlRenderer.WinForms
- Microsoft.CrmSdk.CoreAssemblies
- Microsoft.CrmSdk.XrmTooling.CoreAssembly
First 2 packages HtmlRenderer.Core & HtmlRenderer.WinForms will be used to create images from the HTML constructed inside the function, on the other hand, the other 2 packages are of course for connecting to the Dataverse instance.
Let's start coding!
Function must have one query string parameter that will be called id and we will send task record id to it.
[FunctionName("GetTaskStatus")]
public static async Task Run([HttpTrigger(AuthorizationLevel.Function, "get", Route = null)]HttpRequestMessage req)
{
    var taskId = req
        .GetQueryNameValuePairs()
        .FirstOrDefault(q => string.Compare(q.Key, "id") == 0).Value;

    return req.CreateResponse(HttpStatusCode.OK);
}
When we have a task id it's time to fetch that task from the Dataverse so let's create a helper class that will do the job for us.
public class DataverseClient{
    private readonly IOrganizationService _service;

    public DataverseClient(){
        var url = "https://YOUR-ORG.crm.dynamics.com";
        var clientId = "YOUR-CLIENT-ID";
        var clientSecret = "YOUR-SECRET";

        var connectionString = $@"AuthType=ClientSecret;Url={url};ClientId={clientId};ClientSecret={clientSecret}";
        var conn = new CrmServiceClient(connectionString);
        _service = (IOrganizationService)conn.OrganizationWebProxyClient
                   ?? (IOrganizationService)conn.OrganizationServiceProxy
                   ?? throw new Exception("Dataverse service is null.");
    }

    public Entity GetTask(string id){
        try{
            var task = _service.Retrieve("task", new Guid(id), new ColumnSet("ownerid", "statecode"));
            return task;
        }catch (Exception ex){
            return null;
        }
    }
}
All you need to do in this snippet is to replace values for the connection string and you are good to go.
Now we need to fetch the task based on the ID passed to the our function and get data from it.
var service = new DataverseClient();
var task = service.GetTask(taskId);

var ownerRef = (EntityReference)task["ownerid"];
var status = (OptionSetValue)task["statecode"];
Perfect, now we have everything we need so we can start constructing HTML that will be converted to image at the end.
We will return status as text and also we will color code it so users can get feedback from it straight away when they see the image. Let's get status text and color values for our task record.
var statusText = "";
var statusColor = "";

switch (status.Value){
    case 0:
        statusText = "Open";
        statusColor = "blue";
        break;
    case 1:
        statusText = "Completed";
        statusColor = "green";
        break;
    case 2:
        statusText = "Canceled";
        statusColor = "red";
        break;
}
When we got those values we are ready to construct the HTML code for our image. We will add 2 divs that will contain the task data and add the background color that we prepared earlier to the div that contains status data.
var html = $@"

    {ownerRef.Name}
    {statusText}
";
After that, all we need to do is create an image from the HTML using the HtmlRenderer library that we added as a package at the start by just one line of code.
var image = HtmlRender.RenderToImageGdiPlus(html);
Finally, we have the image we need to present our data. The last step of the web service part will be returning the image from it. It's a little bit different than the basic JSON objects that are most commonly used as return values.
The image needs to be converted to bytes array first and after that response, content must be created from those bytes array. RenderToImageGdiPlus method returns PNG image by default and that's why we need to set the content type to image/png too.
var imageConverter = new ImageConverter();
var bytes = (byte[])imageConverter.ConvertTo(image, typeof(byte[]));

var response = new HttpResponseMessage(HttpStatusCode.OK){
    Content = new ByteArrayContent(bytes)
};

response.Content.Headers.ContentType = new MediaTypeHeaderValue("image/png")
Whole function code should look lie this if you just want to copy it in one go.
[FunctionName("GetTaskStatus")]
public static async Task Run([HttpTrigger(AuthorizationLevel.Function, "get", Route = null)]HttpRequestMessage req){
    var taskId = req
        .GetQueryNameValuePairs()
        .FirstOrDefault(q => string.Compare(q.Key, "id") == 0).Value;

    var service = new DataverseClient();
    var task = service.GetTask(taskId);

    var ownerRef = (EntityReference)task["ownerid"];
    var status = (OptionSetValue)task["statecode"];

    var statusText = "";
    var statusColor = "";

    switch (status.Value){
        case 0:
            statusText = "Open";
            statusColor = "blue";
            break;
        case 1:
            statusText = "Completed ";
            statusColor = "green";
            break;
        case 2:
            statusText = "Canceled";
            statusColor = "red";
            break;
    }

    var html = $@"

        {ownerRef.Name}
        {statusText}
    ";

    var image = HtmlRender.RenderToImageGdiPlus(html);

    var imageConverter = new ImageConverter();
    var bytes = (byte[])imageConverter.ConvertTo(image, typeof(byte[]));

    var response = new HttpResponseMessage(HttpStatusCode.OK){
        Content = new ByteArrayContent(bytes)
    };

    response.Content.Headers.ContentType = new MediaTypeHeaderValue("image/png");

    return response;
}
Now we have everything we need so we can test the web service to see if the right values are showing in the image.
Create one open task we have stored in the Dataverse.
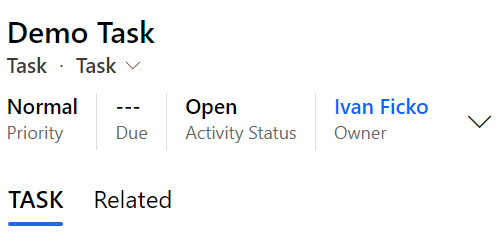
Let's call function with ID of that record as a prameter.
http://localhost:7071/api/GetTaskStatus?id=29dd21f8-53b7-eb11-8236-000d3abf6f1e
If everything went well we should get image that says Open marked in blue and shows my user as a Owner.

It's working as expected so let's mark that task as completed and see what will we get now.
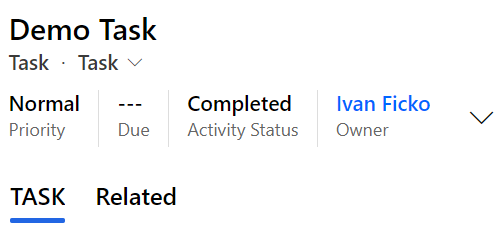
This time we will get status text Completed and marked in green color.

Perfect, we now have a web service that can be used in the email straight away after we deploy it in Azure which is something I assume you are familiar with if you used Functions before so it will not be covered in this example.
Setting up Power Automate Flow
First thing here you need to get URL of the function from Azure that will look something like this.
https://img-gen.azurewebsites.net/api/GetTaskStatus?code=SOME-FUNCTION-CODE&id=29dd21f8-53b7-eb11-8236-000d3abf6f1e
After you got this let's create a basic Power Automate Flow.
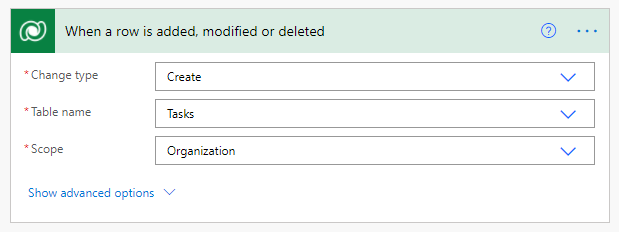
Trigger for our flow should be set up on create of the task record which is pretty much straight forward.
Next step is to send a email to the user. The important part here is to open code view in email action and start writing HTML there.
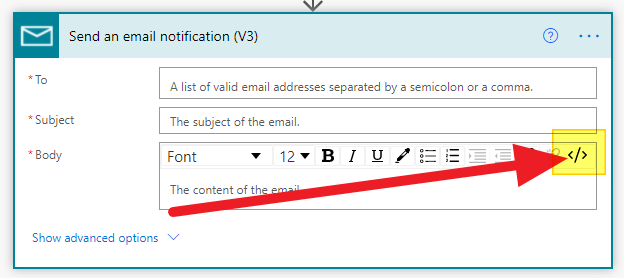
When you opened the code view simply add img HTML tag with src attribute that points to the function URL and add dynamic ID parameter to it like shown below.
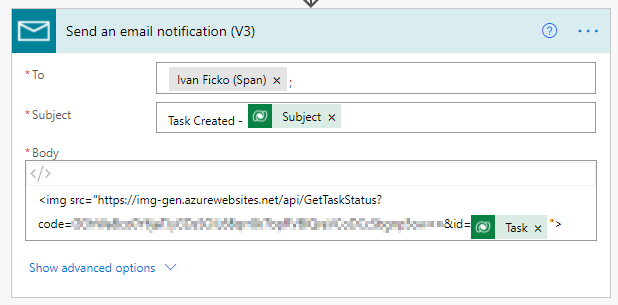
Finally we have everything set up and we can see the whole process in action.
Create a new task and check your email and you should see the image in email that shows Open status for task.
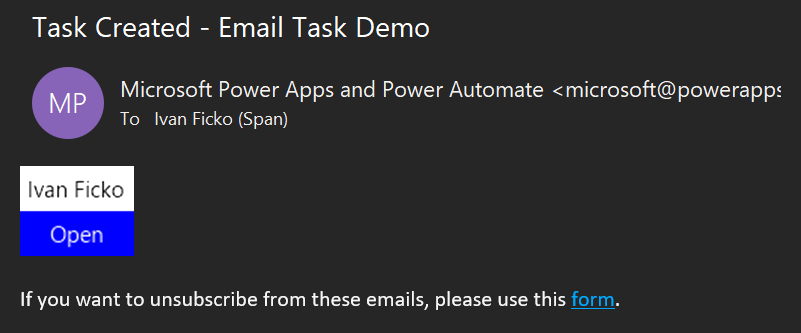
If we close the task and check the email once again we should see the Completed status on the image.
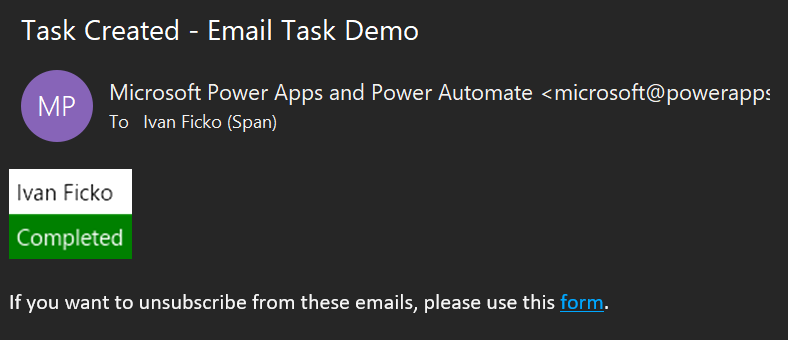
Now you are able to present a real time data inside the email to your users. How cool is that?
Conclusion
This example shows you that you can construct live information about the data stored in Dataverse straight from the email notifications. Your users don't need to access model-driven apps before they realize if they actually need to do something with the record sent in the email.
Where do I use this kind of approach in the real world? Let's say you send an email to the distribution list that has multiple people in it and that they can work on that item. Some people are slow in reading emails and they maybe don't need to bother with it if the item is already picked by someone else or maybe even completed.
